N8N Self-Hosted for Free: Step-by-Step Beginner Tutorial (No Code)
Learn how to self-host n8n for free with this easy, step-by-step beginner tutorial. No coding needed — set up n8n using Docker and ngrok and access your workflow editor online.
Run n8n Locally with Docker and Ngrok
n8n is an open-source workflow automation tool that you can self-host for free instead of paying for a cloud service. In this beginner-friendly tutorial, we’ll show you how to run n8n on your own machine using Docker Desktop and ngrok, with zero coding required. We’ll walk through each step — installing Docker and ngrok, pulling the n8n image, configuring it, and opening it to the internet. By the end, your n8n editor will be accessible via a public URL, letting you build and test automations from anywhere (even with webhooks).
Why Self-Host n8n (and What You Need)
Self-hosting n8n means you run it on your computer (or a server you control), so you avoid subscription fees while still getting all the power of n8n. To do this, you’ll need two main tools:
- Docker Desktop – a container platform that can run n8n in an isolated environment. (Install it from docker.com for Windows, macOS or Linux.)
- ngrok – a tunneling tool that exposes your local n8n (running on port 5678) to the internet via a public HTTPS URL. Sign up at ngrok.com and install it following their instructions.
These tools have free tiers and installers, so there’s nothing to code or pay. (Follow ngrok’s setup to add your authtoken via ngrok config add-authtoken YOUR_TOKEN — this ties your account to the tool.) Once both are installed, you’ll have Docker’s GUI and the ngrok CLI at your disposal.
Step 1: Pull and Configure the n8n Docker Image
With Docker Desktop running, we’ll download and set up the n8n container.
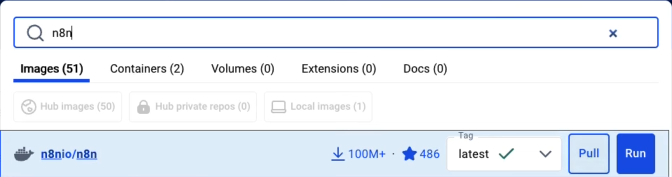
- Open Docker Desktop and go to the Images tab. In the search bar, type
n8nio/n8nand Docker the official image (it has many millions of downloads). Alternatively, from a terminal you could rundocker pull n8nio/n8n.
- Once the image is downloaded, click Run to create a new container. In the dialog box:

- Name: give it a friendly name (e.g.
n8n-demo). - Ports: map host port 5678 to container port 5678 (write
5678on both sides). This lets you access n8n atlocalhost:5678. - Volumes: click Add Volume, choose (or create) a local folder (e.g.
./n8n_data), and map it to/home/node/.n8nin the container. This ensures your workflows and credentials are saved on your computer rather than lost on container restart.
-
Still in that dialog, expand Environment Variables. Add these key-value pairs (replace
<your-ngrok-url>with your actual ngrok domain, which you’ll get in the next step):N8N_COMMUNITY_PACKAGES_ALLOW_TOOL_USAGE = trueN8N_EDITOR_BASE_URL = https://<your-ngrok-url>.ngrok.appWEBHOOK_URL = https://<your-ngrok-url>.ngrok.appWEBHOOK_TUNNEL_URL = https://<your-ngrok-url>.ngrok.appN8N_DEFAULT_BINARY_DATA_MODE = filesystem
These settings tell n8n to use your ngrok URL for its web editor and webhooks, and to store any binary data (file attachments) on disk. (If you skip the tunnel variables, n8n might generate localhost-only webhook URLs that won’t work externally. The
WEBHOOK_TUNNEL_URLfixes that by pointing all webhook traffic through your ngrok address.) -
Click Run. Docker will start the container with n8n inside. You should see logs indicating n8n has started.
# Example docker-compose.yaml snippet (optional)
version: '3'
services:
  n8n:
    image: n8nio/n8n:latest
    container_name: n8n
    ports:
      - "5678:5678"
    volumes:
      - ./n8n_data:/home/node/.n8n
    environment:
      - N8N_COMMUNITY_PACKAGES_ALLOW_TOOL_USAGE=true
      - N8N_EDITOR_BASE_URL=https://<your-ngrok-url>.ngrok.app
      - WEBHOOK_URL=https://<your-ngrok-url>.ngrok.app
      - WEBHOOK_TUNNEL_URL=https://<your-ngrok-url>.ngrok.app
      - N8N_DEFAULT_BINARY_DATA_MODE=filesystem
(The above YAML shows the same configuration if you prefer Docker Compose over the GUI. It sets the image, port mapping, volume, and environment variables as described.)
Step 2: Expose n8n to the Internet with ngrok
Now that n8n is running locally (on port 5678), we use ngrok to create a public URL.
-
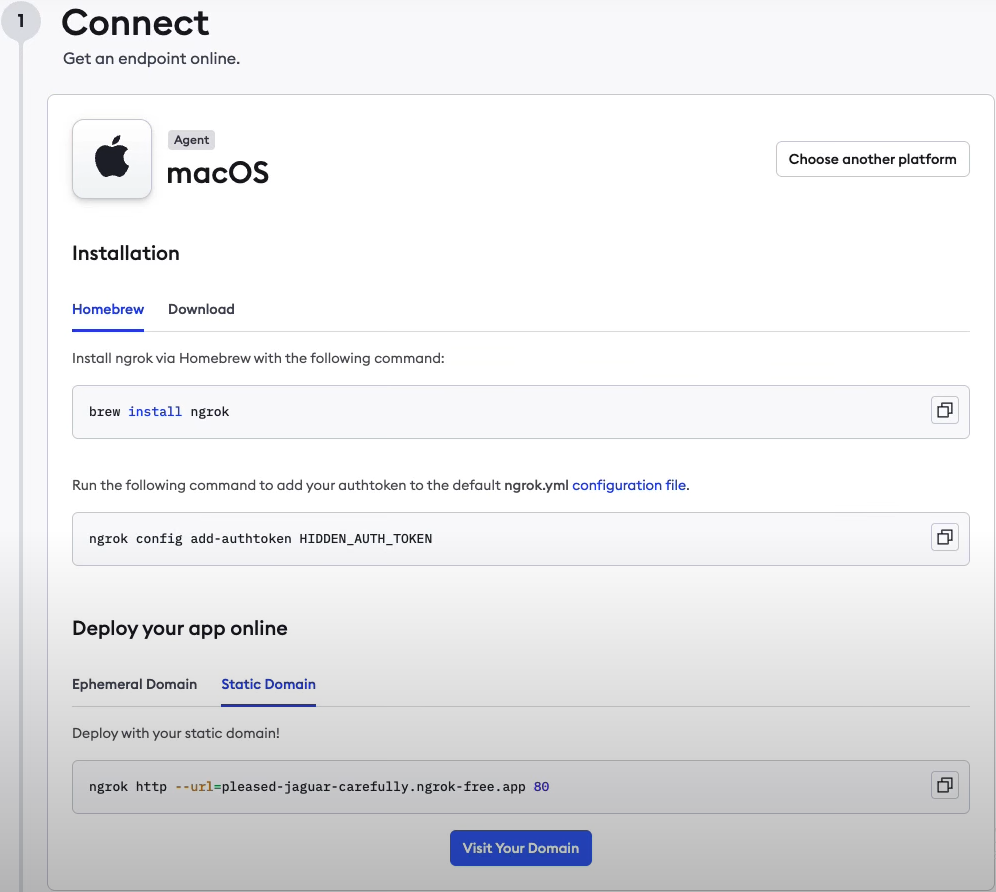
Start ngrok: Open a new terminal window. Run a command like:
ngrok http --url=<your-ngrok-url>.ngrok.app 5678Replace
<your-ngrok-url>with a subdomain you reserved in ngrok (if you opted for a static domain) or leave it out for a random URL. This opens a secure tunnel to your local port 5678. -
Check status: ngrok will display a console with a “Session Status: online” and a public HTTPS URL (e.g.
https://abc123.ngrok.app). Do not close this terminal — ngrok must keep running to keep the tunnel active. -
Verify n8n is live: With ngrok online, open your browser and go to
https://<your-ngrok-url>.ngrok.app. You should see the n8n editor UI. If you open the browser while the Docker container is running, n8n will be accessible at that public ngrok address. (Sometimes you may need to refresh once ngrok is live.)
Once ngrok shows “online” and you refresh, the error disappears and n8n’s workflows page loads successfully. The n8n editor now thinks it’s being accessed at the public URL you set (because of the N8N_EDITOR_BASE_URL you configured), so everything works as if on a real server.
Step 3: Run Your First Workflow (No Code!)
Congratulations — your self-hosted n8n is now up and running for free, with no coding needed. You can now build and run automation “flows” by dragging and dropping nodes in the n8n interface. Because we used ngrok, any webhooks or integrations (Telegram, GitHub, etc.) can reach your n8n via the internet. Just use the https://<your-ngrok-url>.ngrok.app/webhook/... address in those services, and n8n will receive the event thanks to the WEBHOOK_URL/WEBHOOK_TUNNEL_URL setup.
Here are a few final tips and next steps:
-
Explore the Dashboard: The n8n editor (accessible at your ngrok URL) has a friendly visual interface. You can add trigger nodes (like “Webhook” or “Cron”) and link them to other action nodes. Watch n8n’s own docs.n8n.io, or try a simple webhook + email demo to test that everything is working end-to-end.
-
Persistence: Since you mapped the volume to
./n8n_data, your workflows and credentials will persist between restarts. You can shut down the Docker container and ngrok (useCtrl+Cin the ngrok terminal) and restart them later. Your data stays on disk. -
No Coding Required: We accomplished all of the above through the Docker Desktop GUI and a few typed commands (ngrok, Docker pull). There’s no need to write code to install or configure n8n. Even the advanced setup with Docker Compose only involved editing a YAML file, not writing application code.
-
Advanced (Optional): For those comfortable with YAML and the command line, the example above can be run with
docker-compose up. The official n8n docs also show Docker Compose setups (with even more options). But the GUI steps we used are enough to get you started quickly.
By following these steps, you have a free, self-hosted n8n running locally and exposed to the internet. This is a great way to learn workflow automation without paying for a hosted service. Enjoy building your automations!
Sources: The steps above are based on n8n’s official configuration recommendations and community guides. For detailed environment variable explanations, see the n8n docs. For learning how each variable works, see community tutorials (which explain that the editor URL and webhook URLs must be set to your ngrok address). These resources helped shape this tutorial to ensure a smooth, no-code setup.